Let me just say that right now I don't have a lot of free time. The great thing about this template is that it comes together in a snap. It's so easy that I had time to make FOUR!
Here there are...
Would you like to win a template of your own?
Leave me a comment telling me which box you like best and then hop along to check out the other templates and what the Design Team has done with them.
Make sure to leave a comment on each blog...every DT member drawing for a template of your choice. Woo hoo! Winners will be announced on Friday, March 25.
Now head on over...ADELAis your last stop on this hop!
Here's the hop list in case you get lost along the way.
I've been gone for awhile....ah life! I don't have much to share because of lack of time. I'll get back to show you somethings I've been busy doing later this week.
Today I had to share a post about this cool thing I saw on My Food Affair. I so want to try this. Check out the link here...so cool looking!
I also wanted to share a poem by EE Cummings that is perfect for the one you love. Love is shared by many...not just your significant other. Of course I thought of all the people I love and especially my mom. This poem is even more poignant to my profound love for her.
I CARRY YOUR HEART WITH ME by EE Cummings (this is how it is written...no caps)
i carry your heart with me (i carry it in
my heart) i am never without it (anywhere
i go you go, my dear; and whatever is done
by only me is your doing, my darling)
i fear
no fate (for you are my fate, my sweet) i want
no world (for beautiful you are my world, my true)
and it's you are whatever a moon has always meant
and whatever a sun will always sing is you
here is the deepest secret nobody knows
(here is the root of the root and the bud of the bud
and the sky of the sky of a tree called life; which grows
higher than the soul can hope or mind can hide)
and this is the wonder that's keeping the stars apart
The birdcage template by Creations by AR can take on so many forms. You will find it here under templates. It's actually called, HOME TWEET HOME. Adela has all FOUR new templates for purchase at 25% off. What a deal!
I've been playing around with it over the last week and come up with a few versions on how to use this really cool template. I always like to get the best "bang for my buck." So I love trying to figure out how to alter a template and being able to use it for more than it's intended purpose.
I also read a blog post by my blogging friend Sally. She has an amazing tutorial on how to make "grudge flowers" using those old paper flowers you already have laying around. I LOVE HER for this!
I recently had all my paper flowers ruined because they got wet. They all bled together. I couldn't bear to throw them away. Her tutorial allowed me to save them.
See how ruined they are here:(
I created these plus the one on the first birdcage photo at the top. Each flower was colored with various copics first. LOVE COPICS TOO!
I LOVE U SALLY!(((BIG HUGS)))
Back to the birdcage...
Here is another idea to make the birdcage into a basket with a handle.
I simply traced another tab on the opposite side. If you get the template you will understand that there is a tab that allows the roof of the birdcage to hinge onto the base. Just add another and then punch holes in each tab to thread your handle through.
Or you can leave the tabs off and just create the base for a simple hexagon shaped box.
This looks so much better IRL. Why does Raspberry Pink photograph so poorly? I need to make a bigger photo box. Plus mine is falling apart and I think it's affected my photos. Anyway, this one has a matching card. I have a very special friend with an upcoming birthday. I created the a "trim" at the top by using black circles. I colored some chipboard flowers with Copics and added a seed bead to each center.
Believe it or not, I have a few other ideas. It will be awhile before I post again. I have a small trip planned and some painting, as well as, some party preparations for my Scentsy business.
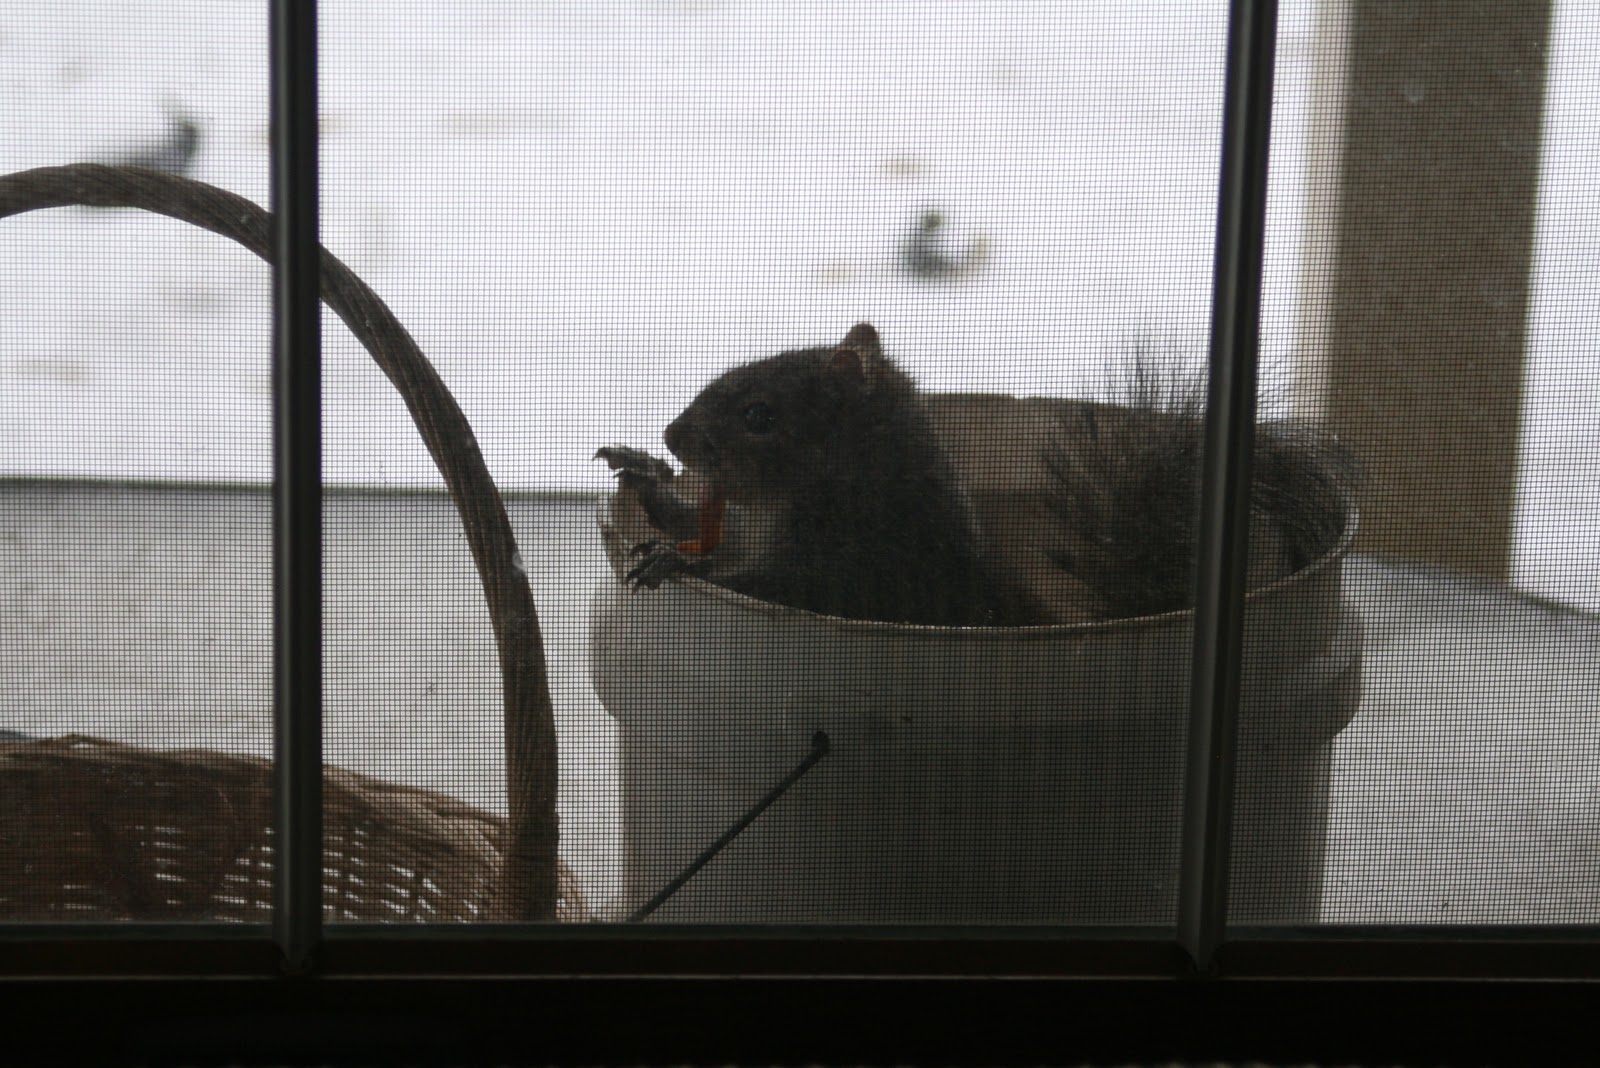
We are on DAY 3 of kids being home due to the weather. We had this little visitor yesterday.
This is my compost bucket and I'm pretty sure this little guy could find no food because of the sheet of ice that is covering the ground. He didn't even move when we all sat right next to the window. He didn't leave until he had had his fill. It made me think, not only about all the creatures out there who must be cold and hungry, but also, all the homeless. As I complain about still living in this house away from my husband and about our heat bill being so high, I am humbled by the fact that I HAVE a home to live in and that I HAVE heat to warm my cold bones. I am thankful for my blessings and for this little visitor who reminded me of just that. Be thankful. I think I'll stick an apple in that bucket today...the WHOLE thing:D
Stay warm my friends and have a very BLESSED weekend. I shall be snuggling with my hubby:)
The following post contains some very personal stuff. I placed it at the end so that you wouldn't have to read it if you are only here for craftiness:)
Good Morning! I hope you are having a great start to your weekend. I know that I have been a bit absent. I apologize. I had my first Scentsy party this week and was busy prepping for that. I started a a template by Adela and haven't quite finished it. Hopefully by Monday. The weekends are very precious here. We spend them with my dear husband. So, there will be no crafting until the weekend is over.
I did want to share a card I made inspired by my mom. At my LSS, I saw this stamp set by Inky Antics. I couldn't resist getting it because the wording encompasses something that my mom loved. Flowers and Sunshine!
This is a card I made a few weeks ago using the scrap from an Amy Butler 5X7 pad. I also used a a stamp from Thankful Accents by Verve to adorn the sentiment panel. Each end is topped with a tiny green rhinestone. The puffy flowers in each corner were a great find at a dollar store...can you believe it? I colored them with a paintbrush and distress ink very lightly and topped each center with stickles. You can click on the photo if you'd like a closer look....don't be too critical though. Pretty sure the stickles aren't dry in the photo. I love stickles, but man, they take forever to dry!
I would like to mention that I am getting rid of almost EVERY STAMPIN UP INK PAD. It will have a reinker that goes with it. I would love to sell them as a set, but might consider selling them as individuals. I might even have the paper that goes with the color.
I am also selling every Stampin Up Marker, except red. That one is a goner:) I do have the red journaling marker to replace it. I also have included a versamarker and a watercolor brush.
Here is the picture.
Cost is $75 plus the cost of shipping.
You can email me (sidebar) and I will figure out shipping to your area.
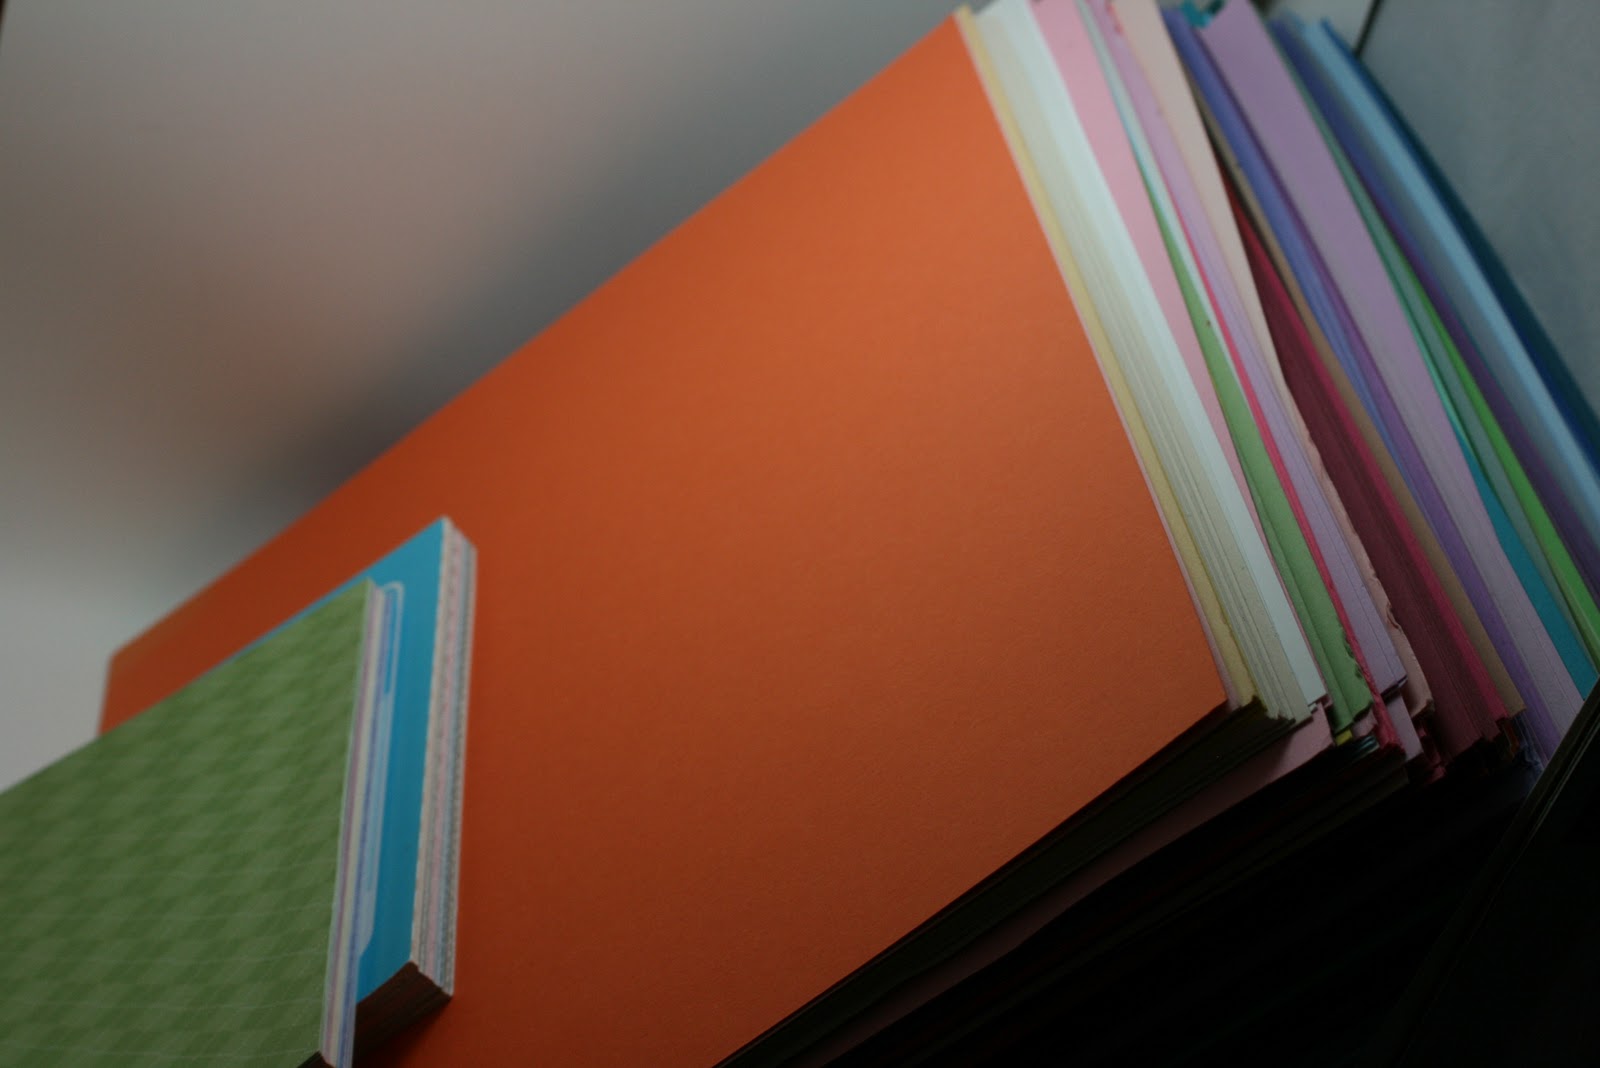
I also have all this paper....
It does not include the two smaller pads. These pictures show the same stack of paper from different angles. There must be at least 200 sheets. I think that is a very LOW estimate, but I'm not going to count:) These are 12x12 of SU colors. Some of the edges are rippled since they have been sitting in racks. I would suggest them to a cardmaker if that is an issue for a scrapbooker.
Cost is $25 plus shipping to your area.
Again the SMALL PADS are NOT included. My friend took those.
I have lots more stuff, but it's just not ready to put up.
One more thing to share on a personal note. I debated writing anymore about my grief. However,the one thing I have realized through blogging and reading people's blogs is that you never know how you may be helping someone else.
Something that you say, or write, may be just the thing that someone else needed to hear. So I will share and the great thing is YOU have the option to stop reading:)
I have had two really good days. Days of smiling and even laughing again. It has been a LONG time. I had such a great time at the Scentsy party and was able to get 3 more parties scheduled from that. Out of 6 guests, that's a GREAT thing! I was so happy! Until yesterday morning when I realized the person I wanted to share that with was not here. I asked her if she knew. Did she know how great that was? Does she know that I'm donating a percentage of my earnings to her fund? Does she know how we are honoring her by donating coats? Does she see that my dog is shedding like crazy?
Remember this dog that you hugged and loved and commented on how she didn't really shed.
Do you know that your granddaughter is plucking her own eyebrows now? Do you see how big she is getting?
Does she know all this stuff that I want to tell her?
All these silly things that I need to share with her. Things that someone else wouldn't care to hear. I know she would listen to it all...with so much interest. I miss her voice and her laughter.
And I CRIED!
I was putting my suitcases away in room. I always keep them in her closet now. I had been in and out of there several times. I managed to just cry and do the things I needed to do. I had to go into her room one more time. I was going to sweep (cause there's a lot of dog hair here) and my dog had left her half eaten chew toy on the floor in my mom's room. As I bent down to pick it up, there was one of her earrings. Do you believe in signs? I do. That earring was not there. We have been in and out of her room everyday. We like to go in there. That earring was not there. You could say that it dropped out of the closet, but I don't know how. There are only a few of her clothes left in there. I do have her earrings, but they are in my room, in a jewelry box at the other end of the hall.
That was the first of several signs yesterday that she was answering my questions. She is here. I got another piece of mail addressed to her yesterday. Her Rite Aid card was sitting out on my counter. My mom hasn't lived her in over a year and a half. Coincidence? I don't think so. Last night I got on Facebook and there was a song that I will share. I had to write a friend back who was checking on me. Her mom died the same day as mine...eleven years earlier. If you are on FB you know that your friends pictures will pop up on the right side. As I was writing my friend back, I looked up and there was my mom's picture and photo album of her and my kids. I took that as another sign. Some may say I'm reaching. That's ok. Even if I am, it brings me comfort.
I just wanted to share that story because it helps me and it may help someone else.
It is still technically Wednesday. Sorry! The day got away from me.
I had hoped to post another Creation by AR, but I didn't get it done. Hopefully by this weekend.
Without further ado, my winner for the Made With Heart Blog Hop is:
Patricia Patricia said...I really like the way you changed up the girl on the first card so she wouldn't look so much like a cheerleader! Very clever. You did a fantastic job coloring the images, too.
Patricia, please email me (left sidebar) so I can get your goodies out to you.
Today I'm going to share a very SIMPLE tutorial on making a box using The Fireplace Card that was released by Creations By AR back in November. I apologize for the delay. My life took an unexpected turn. I'm getting back into the swing of things. Again, that you for your patience.
Here is the box and card I made back in November...
To make this box, you will need:
The FIREPLACE CARD TEMPLATE ( printed on copy paper and cut out) 1 ~ 8 1/2 x 11 sheet of cardstock scissors bone folder strong adhesive (Scor tape is what I use)
(I always apologize in advance for the pictures. Fluorescent lighting and one handed photography are a bit tricky:) You will also note that my hands are in the pictures. That is to protect the copyright of this template.)
TIP: CLICK ON PHOTO FOR A CLOSER LOOK
STEP 1.
Place template on the cardstock and trace top and bottom except for the area that has the GIANT "X".
Leave off that part of the template for now. See Photo Below
This is a bad photo...it only shows the top part of the traced template. Make sure you trace the bottom straight across to the marked point that is shown in the middle photo
Step 2. Flip the template upside down and line up where you stopped tracing with the marks on the above photo. (See how I just took the template and flipped it over so that the top is now the bottom? I hope that makes sense.)
Step 3. Trace the right side of the template. This is the section that had the BIG "X" on it in the first step.
Step 4. Cut out this "new" traced template.
It should look like this when you are done .....
Does this make sense? I hope:)
Step 5. Now lay your original template over the top of the cut out template and score where all the "tick" marks are located. The exception is the middle marks where I have "x'd" on the picture. Don't forget to turn it around and score the other tab that is at the bottom of the template too.
( As I was writing this out, I remembered my idea for another way to make this a box and for it you have to score ALL the tick marks on the side, but not at the top of the box....I will show you at the bottom of this post the variation. )
Step 6. Fold on all score marks and then apply adhesive to the small flap on the left ( see X's) and adhere.
Step 7. This picture shows the bottom closure of the box. It is optional to apply adhesive here. However, if you are going to put anything inside with some weight, I would recommend it. Otherwise, the contents may fall out.
Step 8. Decorate box:) or not...the choice is yours.
This box is just the right size to add some mini candy bars or a small bag filled with red hots, M&M's...you get the idea.
Here is the variation of scoring all 3 tick marks for the side. Then at the top, only score the line closest to the body of the box.
This creates more of a triangular shaped box from the side. You could close this by tying with a ribbon or applying a temporary adhesive on the under side. Put a giant flower in the front and have the tab tuck into it even. This sample is just a mock up because the paper I used did not score well:)
Please let me know if you have any questions. My email is on the left side bar.
....that when you Drink and Drive you are 4 times more likely to get into an accident?
....that when you TALK on a Cell Phone and Drive you are 4 times more likely to get into an accident?
.....that when you TEXT AND DRIVE YOU ARE 8 TIMES MORE LIKELY to get into an accident? You are WORSE than a DRUNK DRIVER!
Make the change and PLEDGE to not talk or text while driving!
Think you are one of the few that can do both. So did all those who have killed or been killed. Your brain will not allow you to do both. Don't be a statistic.
Did you know that if you click on any picture on my blog it will enlarge it? Yep! Just like that...larger than life. That way you can see all the little details....and mistakes. Just ignore the mistakes though, ok?
Welcome to my blog! I am a SAHM again. Life has taken me in a new direction. I'm not sure what that looks like just yet, but writing about my life seems a natural thing to do. Life is funny....and serious....and inspiring and many times too short. I wish I had started documenting it years ago. That's the great thing though. Each day has a fresh new start that is full of second chances and new beginnings. It's never too late to live.